OnboardingV1:Tutorial: Installing Ubuntu multi-boot on your Windows computer
Author: Alex Yelovich
BEFORE PROCEEDING MAKE SURE THAT YOU HAVE ANY IMPORTANT DATA BACKED UP ON A SEPARATE DRIVE THIS TUTORIAL WILL MAKE PERMANENT CHANGES TO YOUR COMPUTER'S DRIVE. IF YOU LOSE DATA IT WILL LOST FOREVER, UNLESS YOU BACK IT UP.
Required Materials[edit | edit source]
- A USB Flash Drive of size 8 GB or more (that will be overwritten. All data on it will be lost, so back it up. You can reuse the flash drive for storage later, but you will need to restore from your data backup)
- If you do not have one we are able to lend you one
- A hard drive with free space of at least 40 GB
Partitioning and Creating an Installer (on Windows)[edit | edit source]
Note: If you have more than one drive in your computer, then we highly recommend using a separate drive for Ubuntu, even if it is not an SSD. So that is one drive dedicated to Windows, and one drive dedicated to Ubuntu. This will make your life much easier.
- (1) In Windows, open Disk Management by searching for it in the start menu.
- (2) Right click the drive you want to install Ubuntu on (if you only have one drive then choose the one with
C:). For instance, in the picture below, since there is only one drive, I would right click on the box that saysDisk 0(on the far left).

- Choose Shrink Volume
- Enter the desired size for the Ubuntu installation. Note that you will not be able to expand the amount of space you have for the Ubuntu installation. For this reason we suggest around 80 GiB with an absolute minimum of 40 GiB.
- There should now be a block in that row that says
Unallocated. - (3) Download the Ubuntu 20.04 ISO.
- (4) Create a Bootable USB Installer for the Ubuntu ISO:
- THIS STAGE WILL ERASE YOUR FLASH DRIVE, MAKE SURE YOU HAVE BACKED UP ANY IMPORTANT DATA ON IT BEFORE PROCEEDING
- There are many ways to create a bootable USB, we recommend balenaEtcher.
The First Reboot and Running the Ubuntu Installer[edit | edit source]
Note: Make sure the bootable USB is plugged into your computer.
(5) Reboot and enter the boot picker on your computer.
- This is usually done by just repeatedly pressing one of
Esc,Delete,F10, orF12keys while your computer is starting up. There usually is a small splash screen when you start your computer telling you which key to press. You can look up the model of your computer or motherboard (if you are on a desktop) to figure out which key to press. - Once you enter your boot picker, select your USB drive by using the arrow keys and hitting enter.
- If you are using one of the USB drives we provide rather than your own, you may see a "Ventoy" screen. Use the arrow keys to select "ubuntu-20.04...". Make sure it is 20, not 22! Then press enter/return to continue.

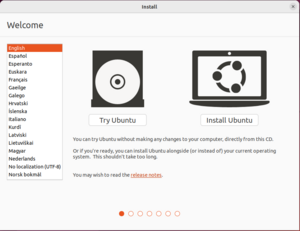
- You should enter another menu. Select
Try or Install Ubuntuby hitting enter.

- When prompted, choose
- Install Ubuntu
- Minimal Installation
- Download Updates
- Install Third Party Software

- Install Ubuntu


(6) Once you reach the screen for choosing the installation, choose Something Else.

- Double click on the free space you created back in Windows (it should have a size around what you specified)
- For size just use the default entry (which should be the rest of the free space)
- Choose Logical and Beginning of Space
- Use as: Ext4 journaling file system
- Mount point:
/(this is the Linux equivalent ofC:in Windows)

(7) Continue and fill in account details, and then the installation should begin. Once it is done your computer should restart and then you should see a screen that looks like the start of the installation. This is the GRUB bootloader. Whenever you want to boot into Ubuntu, select the Ubuntu option, and whenever you want to boot into Windows choose the Windows Boot Manager option.
